ESP32 GNSS Station
This repository contains code for a ESP32 based GNSS station. It is written in C/C++.
The goal here is to make a GNSS receiver station that can connect to a server and transmit the GNSS frames it receives while keeping it as low-cost as possible, so that the barrier to entry to contribute GNSS frames is as low as possible.
This firmware supports the T-Beam V1.2 development board (make sure it has a UBlox M8N GPS module on it!), and custom designs.
For custom boards or designs, the ESP32-C3 (a normal ESP32 should also work) + UBlox M8N module combo is a decent option: the ESP32 has good documentation and is widely available, while the UBlox modules should be usable for this case (although UBlox M9x modules would, in theory, be a better option for this, although they are more expensive to get)
This repository uses the ESP-IDF libraries and framework to compile; it has been tested with the ESP-IDF extension (using ESP-IDF v5.5.0) in VSCodium.
Documentation for this repository is maintained in the documentation repository. Instructions on how to setup a base station are maintained on this page.
(This small part describes differences of configuration modes when the binaries are preparing. So it can be skipped, if you only want to flash the ESP32-C3 with an available pre-built firmware file)
idf.py menuconfig → OpenAGPS Base Station Configuration → Configuration mode
selects one of two modes:
- Runtime: Wi-Fi credentials, OpenAGPS server URL, and token are provisioned over Wi-Fi and stored in NVS. Compiled credentials are not used. For general use, this is the recommended mode.
- Fixed: set
WIFI_STA,WIFI_SECRET,OPENAGPS_SERVER, andOPENAGPS_TOKENin menuconfig. The device uses these settings without starting a provisioning service. Existing runtime settings are left in NVS but unused/ignored.
WIFI_MAX_TX_POWER applies in both modes, and should be set to a suitable value
depending on the laws and regulations in your jurisdiction. sdkconfig.defaults
supplies mostly reasonable defaults that should, for most users, be correct.
The supplied flash-size default is 4 MB; check your board.
GitLab CI builds firmware targetting the ESP32-C3 in Runtime mode. Check the CI build artifacts for the latest build, and download the artifacts ZIP file.
After unpacking the artifacts ZIP file you will have this set of files:
build
└── ci
    ├── bootloader
    │   └── bootloader.bin
    ├── esp32-c3-ublox-openagps.bin
    ├── esp32-c3-ublox-openagps.elf
    ├── esp32-c3-ublox-openagps.map
    ├── flash_args
    ├── flasher_args.json
    ├── merged-binary.bin
    ├── partition_table
    │   ├── partition-table.bin
    │   └── partition-table_orig.bin
    └── sdkconfig
To flash the ESP32-C3 the esptool utility is needed. Either install it from your
distro's package manager, if available, e.g. in Debian GNU/Linux:
sudo apt-get update && sudo apt-get install -y esptool
or install it using pip:
sh pip install esptool
Before flashing the device, please check if your user account has sufficient permissions for that. E.g. in Debian GNU/Linux the user must be a member of the group "dialout".
To check your group memberships in Debian GNU/Linux run this in a terminal: groups.
If you are not in a group dialout, you can add yourself to:
sudo usermod -aG dialout <username>
Instead of <username> use your account.
To update group membership in your current session you must logout and login or, alternatively, use the newgrp command.
python3 -m pip install 'esptool>=4.9,<5'
python3 -m esptool --chip esp32c3 --port /dev/ttyACM0 write_flash 0x0 build/ci/merged-binary.bin
Replace /dev/ttyACM0 with your board's serial port (for example, COM3 on
Windows, /dev/ttyUSB0 on Debian GNU/Linux).
Alternatively, flash the separate binaries using their generated offsets and settings:
cd build/ci
python3 -m esptool --chip esp32c3 --port /dev/ttyACM0 write_flash @flash_args
The merged image fills gaps between partitions, including NVS, and therefore clears saved provisioning settings. If required, use seperate binaries to avoid clearing the NVS to retain provisioning settings. After flashing, follow the Runtime provisioning instructions below.
The computer needs a 2.4 GHz Wi-Fi adapter managed by NetworkManager, Python 3.10 or newer, and permission to activate NetworkManager connections.
For this step you will need Python scripts and dependencies from this project. There are two simple methods to get the files:
Method with git:
git clone https://gitlab.com/openagps/esp32-c3-ublox.git
Method without git, using a zip-archive:
- Download esp32-c3-ublox-main.zip
- Unpack esp32-c3-ublox-main.zip
In short, you need to run the provisioning script on a suitable GNU/Linux machine, and use it to connect to the Base Station's WiFi setup AP.
Example 1 (using the Python virtual environment):
python3 -m venv .venv
.venv/bin/pip install -r tools/requirements-provision.txt
.venv/bin/python tools/provision.py --list
.venv/bin/python tools/provision.py --ssid 'Your Wi-Fi' --server 'https://your-server.example'
Example 2 (without Python virtual environment):
cd esp32-c3-ublox-main
sudo apt update && sudo apt install -y python3 python3-cryptography python3-protobuf
python3 tools/provision.py --ssid 'Your Wi-Fi' --server 'https://your-server.example'
Use --interface wlan0 if the computer has multiple adapters, and
--device OpenAGPS_XXXXXX if multiple boards are in setup mode. Provisioning
temporarily disconnects the selected adapter from its current network, creates a
temporary setup connection, and restores the previous connection afterward.
The script should ask you for a WiFi password and for a token used to authenticate the Base Station to the OpenAGPS Porygon server; provide them both when asked.
For unattended use, --config /path/to/private.json accepts a JSON object with
ssid, password, server, and token.
After successful provisioning, the AP shuts down and later boots reconnect using
NVS settings. To reconfigure, reboot with the saved Wi-Fi AP unavailable. After
60 seconds the open setup AP appears. This timeout is configurable through
OPENAGPS_PROVISIONING_FALLBACK_SECONDS. Boards with a configuration button
can also enter setup during the first three seconds of boot. Invalid Wi-Fi
credentials leave setup available so the helper can be run again.
Alternatively, the NVS can be cleared using esptool, with a command similar
to this (when using the default large application partition layout):
python -m esptool --chip esp32c3 --port /dev/ttyACM0 erase_region 0x9000 0x6000
The currently recommended hardware for a base station is the following:
- A ESP32-C3
- A UBlox M8N Module or newer
- There are many counterfeit M8N modules which do not contain the flash memory needed for a required firmware update; confirm before building the base station that your module has a flash memory module, and that the firmware version is up to date!
- We generally recommend using a M10N module.
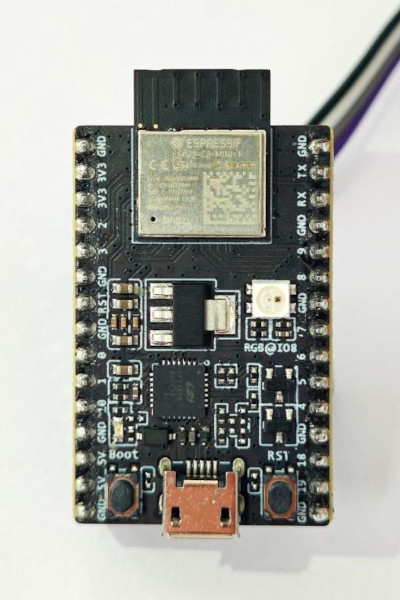
ESP32-C3-MINI-1
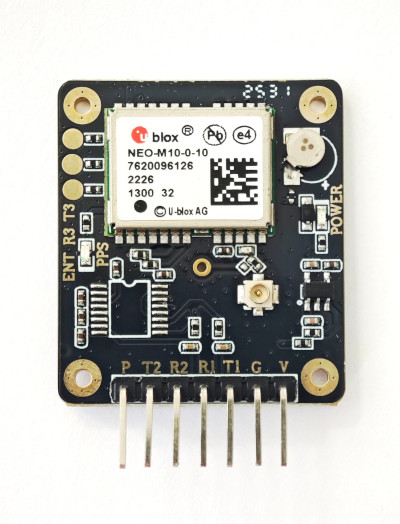
UBlox NEO-M10-0-10
For custom boards, testing of this code is done using a ESP32-C3 SuperMini module from TENSTAR (a very cheap board from AliExpress) and a UBlox NEO-M8N module (also very cheap from AliExpress) or a more expensive (and generally better) M10N board; the default pin configuration is:
- UBlox RX (on M10N boards, sometimes labeled R1) to ESP-C3 pin 4
- UBlox TX (on M10N boards, sometimes labeled T1) to ESP-C3 pin 3
If the receiver can be powered on/off externally, the power pin should be connected to pin 8; this probably isn't really needed though.
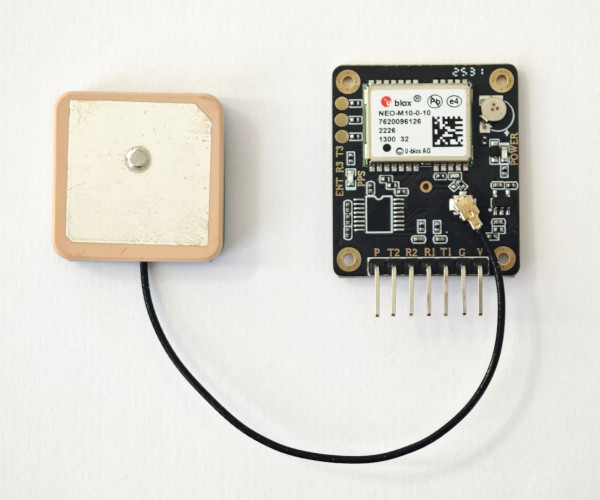
UBlox M10-0-10 with a connected GPS antenna
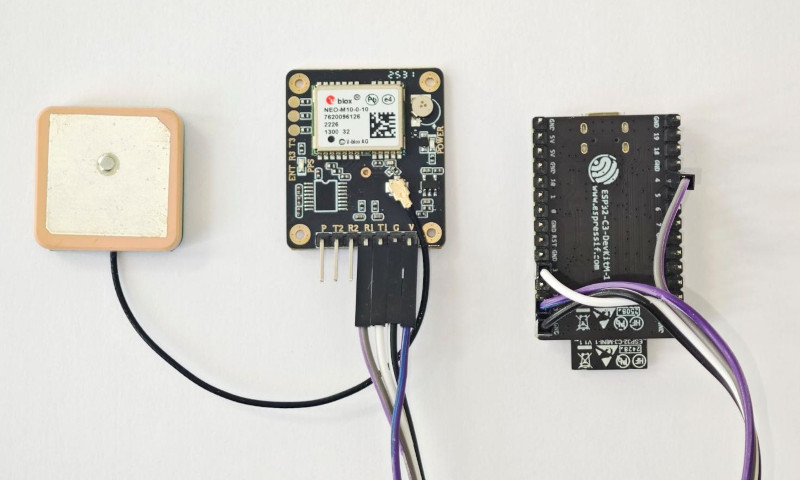
All modules are connected
On the photo above the devices are connected with colored wires:
- grey: ESP 4 -> M10 R1
- white: ESP 3 -> M10 T1
- black: ESP GND -> M10 G
- violet: ESP 3V3 -> M10 V
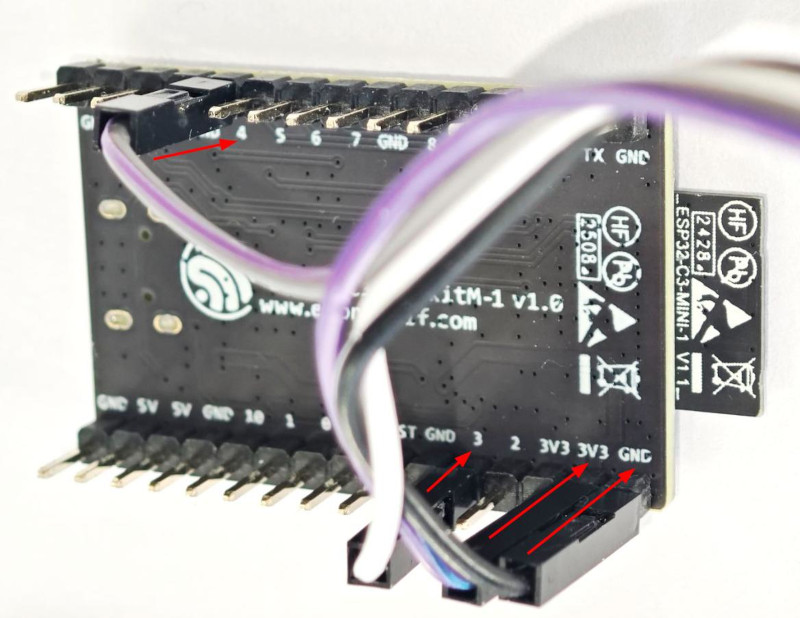
ESP32-C3-MINI-1 detailed pinouts
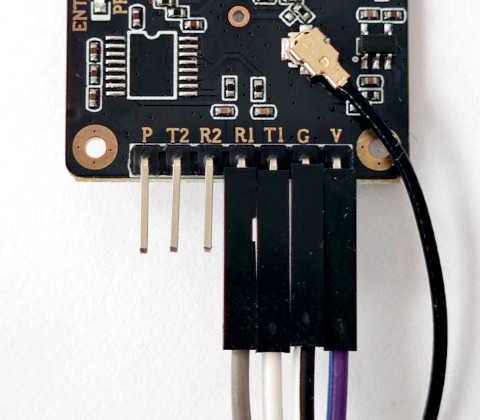
NEO-M10-0-10 detailed pinouts
The code here is licensed under the GPLv3, see the LICENSE file.